Tuesday, February 23, 2016

Top 10 Ways to Fix High RAM/CPU Memory Usage after Windows 10 Update

Windows 10 update problems have affected many users. We’ve dedicated to offering workable solutions to fix all Windows 10 issues during update and after update. See below to fix Windows 10 high memory usage issue.

Many Users Got High Memory Usage Issue after Windows 10 Upgrade

Another Windows 10 update issue again! Many users reported that RAM and CPU usage went up after installing Windows 10. The detailed situations of this Windows 10 high CPU/RAM memory usage issue are like that “I’m having an issue, very high memory usage by System”, “playing games on my computer uses almost all 4 GB usage on Windows 10”, “I installed Win 10 but got high RAM usage. It tends go up to 90% without anything substantial open”, “I updated my PC to Windows 10 but during few hours of usage memory builds up again to 70% and if not restarted it further goes to 100% and later on even freezes and crashes”, "Windows 10 running high cpu usage"……
Read more:

What Causes the Windows 10 High Memory/RAM/CPU Usage

Less RAM of your computer is not the cause. Users having 4GB of RAM have less complaints, while more and more users with 8GB and even 16GB of RAM have experienced high RAM usage problems after updating to Windows 10. There are several key reasons why the memory usage runs out after installing Windows 10.

  • Memory leak. Windows 10 is experiencing driver incompatibility issues. A faulty or outdated driver can lead to a Memory leak.
  • Windows 10 and the applications you have installed on it needs a few more RAM memory to operate
  • Registry hack settings can lead to high RAM usage on Windows 10.
This issue may cause computer crashing, freezing, and running slower and slower. Bad performance. Luckily, there are easy solutions to solve this high memory/RAM/CPU usage issue on Windows 10.

Top 10 Ways to Fix High RAM/CPU Memory Usage on Computer after Windows 10 Upgrade

We’ve summed up 10 best solutions to help you fix this memory usage going high on Windows 10. You can try any of them on your laptop, desktop PC or notebook computer of Lenovo, Asus, Acer, Dell, HP, ThinkPad, Toshiba, IBM, Sony, Gateway, Samsung, IBM, etc.

Top 1. Registry Hack

In fact high memory usage not only occurs in Windows 10, but also happens in Window 8 and Windows 8.1. The Windows 8/8.1 registry hack can fix this high memory issue in Windows 10.
Step 1. Hit Windows Key + R Type in Regedit and then hit Enter.
Step 2. Go to: HKEY_LOCAL_MACHINE\SYSTEM\CurrentControlSet\Control\Session Manager\Memory Management in the editor.
Step 3. Find ClearPageFileAtShutDown and change its value to 1.
Step 4. Restart the computer.

Top 2. Fix Driver Issues on Windows 10 with 1 Click

It’s really hard to check the driver issues manually, but there is one all-in-one driver fix tool, Driver Talent (formerly called DriveTheLife), which helps you 1 click to find out the driver problems and then fix them 1 click. You can try this tool to repair the corrupted, damaged, or incompatible drivers, download and install the best-matched drivers if they are missing, and update to the latest drivers if them are outdated.
Download and install Driver Talent on your computer.
1,101,554 people have downloaded it
998,756 people have downloaded it
UpdatedDriveTheLife has been updated to the new version called Driver Talent with a fresh new look.
Step 1. Run Driver Talent to scan your computer to identify all driver issues.
Step 2. Fix the driver issues by clicking on the buttons of “Repair”, “Update”, “Reinstall”, “Install”, etc.
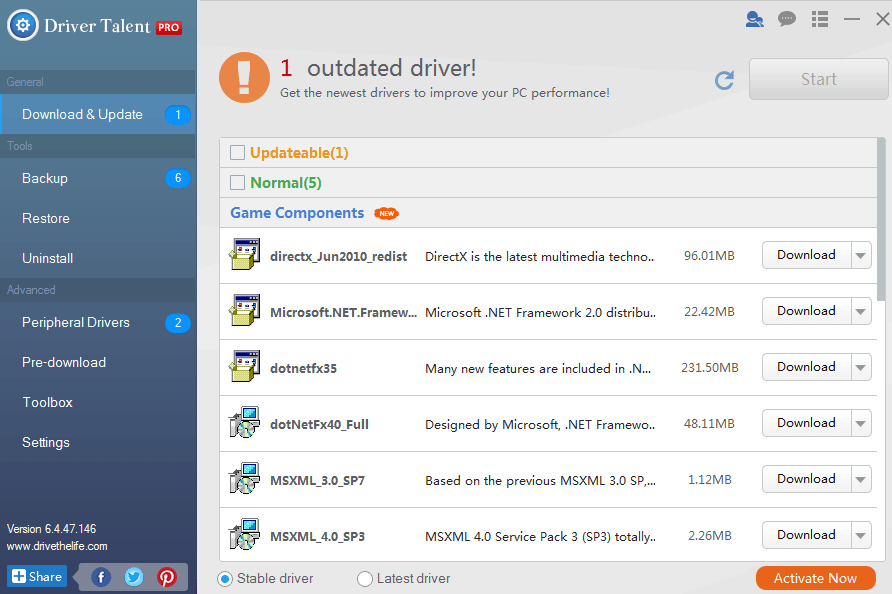
fix high ram usage on windows 10
Step 3. Restart the computer after all the drivers are fixed.

Top 3. Fix Driver Issues Manually

Step 1. Download and install Windows Driver Kit from Microsoft official website.
Step 2. Go to the “Start” menu from Windows key and open “Command Prompt”. Right click on the resulting icon and select “Run as Administrator” from the drop-down men.
Step 3. Type “cd C:Program Files (x86)Windows Kits8.1Toolsx64” and press “Enter” to go to the directory in the command prompt where WDK was installed
Step 4. Type “poolmon.exe” and then press “Enter”. When the utility opens up, press “P” to sort via pooltype and then “B” to sort it according to number of bytes.
Step 5. Note down the pooltag of the item which is using a majority of the memory. Open another command prompt to check which driver the tag belongs to. For this type f indstr / s then the tag which you have noted
Step 6. The command will point to a specific sys file. Open the file properties to check which driver the file belongs to.
When you find out the driver, head over to the Microsoft site to download the official driver for Windows 10. Alternatively, try Driver Talent to install the Windows 10 drivers (all drivers are official and WHQL ones from manufacturers and from Microsoft).

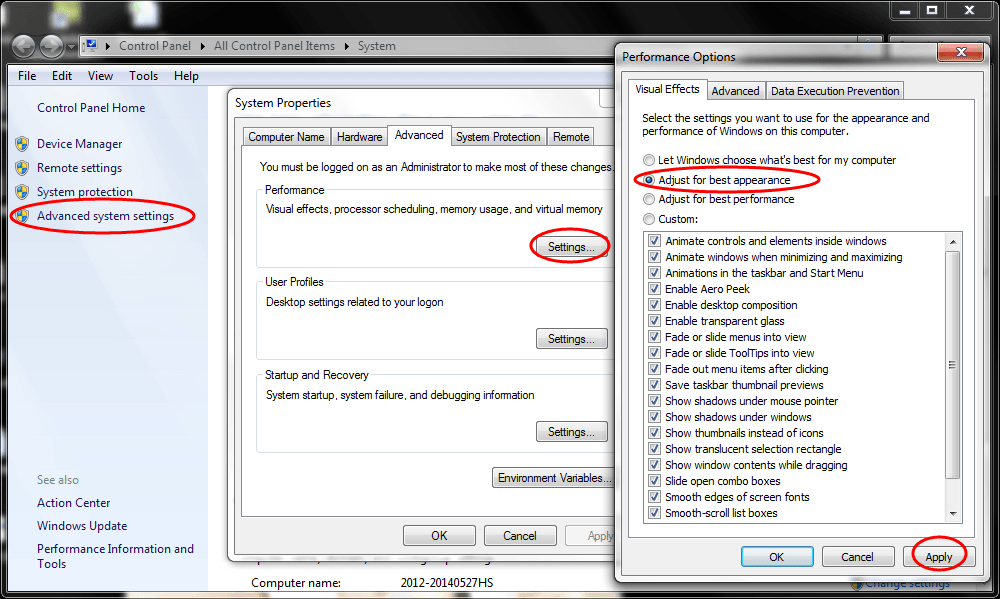
Top 4. Adjust for Best Performance

Step 1. On the start screen of Windows 10, click on the “Desktop” icon.
Step 2. Right click on “Computer” icon and select “Properties”.
Step 3. Select “Advanced System settings” to go to the “System properties” windows.
Step 4. Select “Settings”, “Adjust for best performance” and “Apply”.
Step 5. Click “OK”. Restart your compuer.
fix high memory usage windows 10

Top 5. Check All Apps Your Are Using

Open the task manager and look into the process tab to check if one of your apps is using more RAM memory then it is supposed to.
Uninstall the apps that you are not using on Windows 10.

Top 6. Disable Programs Running at Startup

It’s suggested that you’d better disable as many programs as possible that are running at startup on Windows 10. This helps to save lots of CPU memory usage.
Step 1. Press the Windows button and “R” at the same time.
Step 2. Type “msconfig” without the quotes in the run window and press “Enter” of the keyboard.
Step 3. The Task manager window pops up. Click on the “Startup” tab and you will see a list of programs that run at startup.
Step 4. Right click on the applications that you don’t want to run at startup and select “Disable”.

Top 7. Defragment Hard Drives

Step 1. Press the Windows button and “R” at the same time.
Step 2. Type “dfrgui” without the quotes in the run window and press “Enter” of the keyboard.
Step 3. In the new window click on the hard drives you want to defragment.
Step 3. Click “Optimize” and follow the instructions on the screen to finish the defragment process.
Step 4. Restart your computer.

Top 8. Close As Many Applications As Possible

Only open the applications you need on Windows 10. Close other applications that you don’t use at that time, especially when you update to Windows 10 on older computer.

Top 9. Scan to Check Third Party Programs

Run a full system virus to scan on your Windows 10 computer to make sure that you don’t have any third party programs that make your system RAM take up more usage.

Top 10. Reboot Your Computer

This is simple but always helpful, especially when the Windows 10 operating system is not working at the speed you think it should be. Rebooting your computer can ensure that you don’t have blocked applications in your process.
Updated: Another useful solution you can try is to get another hard drive. This can help to ease the uptight CPU usage. Thank you for all the readers who share workable methods with us.
These methods can ensure that your Windows 10 only uses the necessary RAM or CPU memory and that the computer is working at the speed it should be. Try any of them till you fix the high memory usage issue after Windows 10 update on your computer. If you have any problem, leave it in your comment, or share this post with your friends if you find it helpful.

Absolutely Remove/Disable Windows 10 Update Notification on Windows 7/8

If you are using Windows 7 or Windows 8, you might have noticed that a new Windows icon in the system tray will bring out a notification saying “Your upgrade to Windows 10 is ready” or the reminder introducing Windows 10 and determines if you’re eligible for a free upgrade. In this post, you will learn what it is, is it legit and how to remove it from taskbar.

Windows 10 Update Notification Shows Up – What’s It?

Ever since Windows 10 is available to public, Microsoft has pushed the Windows 10 update notification through the “Get Windows 10” app in the system tray in Windows 7 and Windows 8. When you click this “Get Windows 10”icon, the notification appears telling you if your PC is Windows 10 ready – this is the Windows 10 upgrade reminder.
Is the Windows 10 upgrade notification legit? Some of you may not be sure if it is some kind of trick or malware. It’s legit, of cause. Microsoft has explained it: This update enables additional capabilities for Windows Update notifications when new updates are available to the user. It applies to a computer that is running Windows 8 or Windows 7 Service Park 1 (SP1).

How to Remove Windows 10 Update Notification in Windows 7 and Windows 8.1/8?

Updating to Windows 10 requires some courage, because it is of risk. We’ve seen so many users encountered Windows 10 upgrade issues like no WiFi, no Internet connection, no soundno Bluetooth, black screen of death, endless reboot root, update failed, etc. Since we’ve dedicated to the solutions to all the Windows 10 update problems in Windows 10 Issues and Fix, you can click to have a look.
If you’ve decided to update to Windows 10, do as you like and refer to How to Successfully Update to Windows 10. If you like to keep your present Windows 7 or Windows 8/8.1, and want to disable Windows 10 update notification, follow the steps below.
Editor’s Note: Before you reach our post, you might have read many articles about how to get rid of this annoying Windows 10 notification but failed. Some of you may have tried to hide the “Get Windows 10” app or hide the Windows 10 update number KB3035583, but this notification still appears later or after you restart the computer. So annoying!! But relax. Just follow the guide step-by-step below and you can absolutely remove Windows 10 update icon from taskbar.
To stop or remove the Windows 10 update notification:

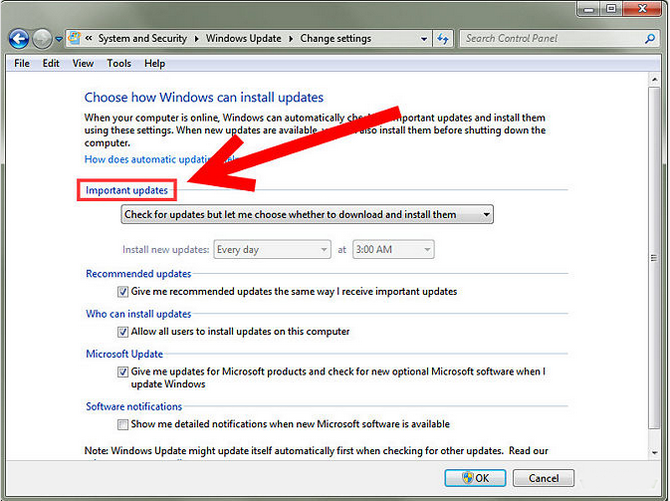
Step 1. Turn off Automatic Windows Update

Go to Windows Update (click on the Windows Start button in the left corner of the system tray and select Control Penal and Windows Update; alternatively, you can type “windows update” in the search box at the Windows Start to locate it.)
windows update
Under Windows Update, choose the setting “Check for updates but let me choose whether to download or install them”.
change settings
Note: Turning off automatic Windows Update won’t stop you from updating drivers. You can try Driver Talent to download and install the latest best-matched drivers for your Windows Operating System.

Step 2. Hide the Windows 10 Upgrade

Hiding the upgrade varies from computers. Some of you can do it while some can’t. But don’t mind too much if you can’t. Check to see if you can hide the update or not.
In Windows Update, click on “Show all Available Updates”. If you see an entry for Upgrade to Windows 10, right-click on it and choose “Hide Update”.

Step 3. Delete the Installation Files

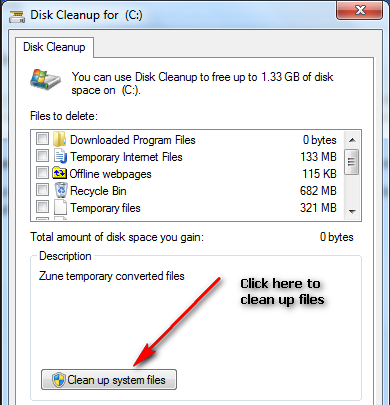
In File Explorer, right-click on your C drive and choose Disk Cleanup. When Explore comes up, click on the box “Clean up System files”. A list will appear. Check the box “Temporary Installation Files” --- about 5.8 GB, and click OK. A message pops up saying “Are you sure you want to permanently delete?” Confirm it and wait until it finishes.
clean up system files

Step 4. Get Rid of the GWX Patches

GWX means Get Windows X.
Back in Control Panel and go to Add or Remove programs. On the left select “View installed updates”. Look for the update numbers: KB 2952664 (likely for Windows 7), KB 2976978 (likely for Windows 8.1) and KB 3035583 (both for Windows 7 and Windows 8.1). If you find any of them, uninstall them. After that, Windows will prompt you to reboot your computer. Just do it. After you reboot the computer, go to Windows Update again and hide KB 2952664 (likely for Windows 7), KB 2976978 (likely for Windows 8.1) and KB 3035583 (both for Windows 7 and Windows 8.1) – right-click on the entry and choose Hide.

Step 5. Reboot Your Computer

Yes, reboot your computer again. This is not that much necessary, but it helps to kill off any process that should be downloading the Windows 10 installation files.
Now you have successfully removed the Windows 10 update nag/notice/files/app/offer……

Updated: Get Windows 10 Icon is Still on Your Computer?

There ‘s also a registry hack that you can use to prevent the icon from showing up.
Open up regedit.exe. you can click on the Start button and type regedit.exe to locate it; alternatively, you can hit WIN + R at the same time to bring out the run window and then past regedit.exe into the field.
Browse down to the following key or create it if it doesn’t exist:
HKEY_LOCAL_MACHINE\SOFTWARE\Policies\Microsoft\Windows\Gwx
Then create a new 32-bit DWORD value on the right-hand side name DisableGwx, and change its value to 1.
Have more suggestions or any questions? Hit me in the comments.

DriveTheLife 6.2.0.2 Released for Windows Users

China, November 26th, 2014 – Drive The Life Co., Ltd., a professional drivers software provider, released the DriveTheLife 6 which is specially designed to update, repair, and manage drivers for all Windows PC (Windows 8.1/8/7/XP/Vista fully supported).
DriveTheLife works for all Windows computer and supports to update and repair drivers for Network card, Motherboard, Display card, Audio Card, Media card, WLAN USB network card. Besides, it offers drivers management including backup, restore and uninstall. All driver problems can be solved and computer performance will be boosted after perfect drivers installed.
"Compared with other similar software, DriveTheLife is designed simply yet efficiently. Intuitive interface makes it super easy to use. Redundant process has been abandoned. We are aiming to let even totally-green users perform it without any skilled problems. Plus, it is completely free." Says Mr. Cao, the Chief Executive Officer of Drive The Life Co., Ltd.

DriveTheLife 6.2.0.2 Key Features

1. Intelligently scan for missing, corrupted, broken, outdated drivers for your device and repair/update it with one click
2. Manage all drivers for your device: Backup, restore and uninstall drivers in one
3. Intuitive interface 
4. Well compatible with all Windows system including Windows 8.1, 8, 7, XP, Vista

Pricing and Availability

DriveTheLife is available to all users for totally free. However, it is safe and clean for sure. You can download and learn more details here: www.drivethelife.com

About Drive The Life Inc.

Drive The Life Inc. is the leading driver software provider and is dedicated to developing powerful and user-loving software on managing Windows device drivers. Over years of development, Drive The Life Inc. is now favored by majority of users in China and becomes quite popular. We didn't provide overseas version before but now we want to make a change and deliver it to the users all over the world. Hope you can like it. We value your feedback. Please feel free to press your comments and opinions.

Contact Information

Free Windows 10 Update – How to Upgrade to Windows 10 from Windows 8.1/8/7/XP/Vista

How to update to Windows 10 from Windows 8 or Windows 7? Or how to update to Windows 10 from Windows Vista or XP? Can't find Windows 10 update reserve icon? If you have already thought about the question of Should I Update to Windows 10 and have decided to install Windows 10 on your laptop, desktop or notebook computer, you can follow the guides below for Windows 10 update.
For more Windows 10 information, read the article about Windows 10 price and key features.

Update to Windows 10 on Desktop, Laptop or Notebook Computer

Installing Windows 10 on your computer is much easier than installing Windows 8 or Windows 7. However, there are many cautions that you need to pay attention to.

Before You Install Windows 10

For the users of Windows 10 Technical Preview, Microsoft also has confirmed that all Technical Previews of Windows 10 will automatically upgrade to the full consumer release version without any loss of data. However, you’d better back up all important data from your computer in case of conflicts and system errors. No matter you upgrade to Windows 10 from what OS, back up anything that is important just to be on the safe side.
Since you change to Windows 10, the drivers of the previous Windows OS (Windows 8.1, 8, 7, XP or Vista) may not match the new system, which will cause conflicts and make your computer not working after update. We've received lots of reports and threads about Windows 10 update issues, like Windows 10 informed you with hardware not working issues, Windows 10 compatibility issue tracker said your BIOS, Bluetooth, WiFi, Andio or graphis card would suffer issues, etc. Windows 10 will remove the drivers that are not compatible with it and that will cause failures. You’d better evaluate whether the drivers are 100% compatible with the new Windows 10. Try Driver Talent (formerly called DriveTheLife) to check it for you. Alternatively, you can use Driver Talent to update to the latest drivers after Windows 10 installation. Both methods work.
1,101,547 people have downloaded it
UpdatedDriveTheLife has been updated to the new version called Driver Talent with a fresh new look.
Note: Updating to Windows 10 takes about one hour to fully complete. Old computers could take longer, while newer, high performance computer may update faster.

How to Upgrade to Windows 10 from Windows 8.1/8/7/XP/Vista


For users of Windows 8.1, Windows 8, and Windows 7, updating to Windows 10 is free (for 12 months), which means you have until July 29, 2016 to upgrade to Windows 10 for free, and after the update, Microsoft will keep you updated for the supported lifetime.
Windows 7 SP1 and Windows 8.1 Update is required for the new update. Some editions are excluded: Windows 7 Enterprise, Windows 8/8.1 Enterprise, and Windows RT/RT 8.1.
To update to Windows 10, follow the 2 steps.
Step 1. Reserve the new update. You can reserve your free upgrade in the “Get Windows 10 app”. After that, Windows 10 will download when available. If you don’t want the update, you can cancel the reservation at any time.
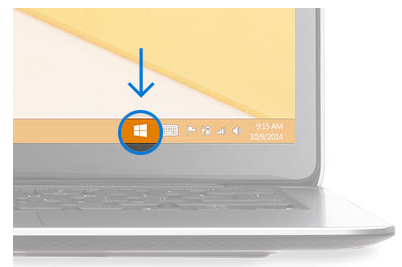
Click on the small Windows icon found at the right end of the taskbar. Click “Reserve your free upgrade” in the app window and enter your email information.
install windows 10
Ste 2. Install Windows 10. You will get a notification once the Windows 10 is available after July 29, 2015. Install it.
For users of Windows XP and Windows Vista, you need to buy this new Windows 10 operating system. It’s a wise choice to upgrade to Windows 8 from Windows XP or Windows Vista, and then wait for the full version to free update.

Can't Find the Get Windows 10 App on Your Computer?

Some users reported that the Windows 10 get app disappeared: "I want to reserve my free copy of Windows 10, but I don’t see the icon on the taskbar". The “Get Windows 10” is an app located in your system tray and it is designed to help you update to the Windows 10. If your current Windows OS meets the requirements of update, it will show up automatically as a Windows icon in your system tray at the bottom right-hand side of the screen.
If the Get Windows 10 app doesn't show up on your computer, it might because:
1.Your computer isn’t up-to-date with at least Windows 7 SP1 or Windows 8.1 Update.
2.Windows Update is not turned on or is not set to receive updates automatically.
3.Your computer is not running genuine Windows OS.
4.Your device is running Windows 7 Enterprise, Windows 8/8.1 Enterprise, or Windows RT/RT 8.1, which are excluded from this reservation offer.
5.You’ve blocked or uninstalled the necessary Windows Update functionality.
6.The network is not available for the update, such as it is managed as part of a school or business network. You can check with your IT administrator.
7.Microsoft will not enable the icon for some PCs before July 29 in case that the PCs are not compatible with the OS.
Make sure your laptop, desktop, noteboo or tablet computer meet all the Windows 10 system requirements.

How to Install Windows 10 Without Reservation -- Fix

If you still can't find the Get Windows 10 app to reserve, or you don't want to get the update through reservation, you can directly download and manually install the Windows 10 update (either 32-bit or 64-bit) on Microsoft website:Directly Download Windows 10.

Windows 10 System Requirements

Please make sure Windows 10 system requirements are fit in your Dell, Aspire, Samsung, Acer, Asus, HP, Sony, Lenovo, Toshiba or more computers.
  • Latest OS: Make sure you are running the latest version either Windows 7 SP1 or Windows 8.1 Update.
  • CPU: 1 gigahertz (GHz) or faster
  • RAM: 1 gigabyte (GB) (32-bit) or 2 GB (64-bit)
  • Free hard disk space: 16 GB for 32-bit OS and 20 GB for 64-bit OS
  • Graphics card: Microsoft DirectX 9 graphics device with WDDM 1.0 driver or later
  • Others: A Microsoft account and Internet access

Can I Downgrade Windows 10 to the Previous OS

What if you don't like Windows 10 after update? Can you go back to the previous Windows 8.1, Windows 8, Windows 7, or Windows XP/Vista? Yes, you can downgrade. You will have one month after upgrading to revert back to the previous version of Windows on your computer.

Fix Display/Video/Graphics Problems after Windows 10 Update

Nvidia, Intel HD, or AMD Graphics Issues after Windows 10 Update

Windows 10 update issues have involved numerous users, the problems including no Wi-Fi on Windows 10no sound after updateblack screen for Windows 10, and the display problems. We’ve listed top solutions workable to fix those issues and you can try them. This post is focusing on the display errors after Windows 10 update and the solution to easily fix it.
Note: A display card is also called a video card, a display adapter, a video adapter, a graphics adapter, or a graphics card.
The most common display issues on Windows 10 are:
  • You get the error message “You may experience problems with the display” from computer when installing Windows 10.
  • The system’s display output crashes after Windows 10 automatically updates the Nvidia graphics card drivers via Windows Update.
  • You get poor image rendering after Windows 10 upgrade.
  • You get stuttering issues when playing video games on Windows 10, especially when playing 3D games.
  • Windows 10 having problems getting the display driver installed.
  • The GPU driver is not working after installing Windows 10, or the video card is not detected on Windows 10.
  • Weird lines are all over the computer screen, or you get black screen after Windows 10 update.
  • After setup Windows 10 in PC video card not found.
In fact, Microsoft has warned you the problems with an Advanced Micro Devices (AMD) graphics when the Windows 10 Technical Preview came out. No matter you are using the Intel (R) HD graphics card, the Nvidia graphics, or the AMD Graphics, try the method below to fix graphics problems.

How to Fix Display/Video/Graphics Driver Issues after Windows 10 Upgrade

The most effective way to fix this Windows 10 display/graphics issue is to fix the graphics driver issue, no matter if it’s the Nvidia graphics driver issue, GPU driver issue, Intel HD graphics issue, AMD graphics issue, etc. Windows 10 update will remove anything that is not compatible with it, including drivers. Therefore, if you get the graphics issues, that’s because the graphics driver is outdated, corrupted, damaged, or missing. How to solve Windows 10 graphics problem?
Locate the latest graphics driver in the manufacturer’s website or from the OEM. This, however, costs you much time and requires some computer technique skills. If you prefer one-click simple method, try Driver Talent (formerly called DriveTheLife). This tool is pop among Windows users. It can help to check if the display driver has issues (if it’s outdated, corrupted or missing), and then install the latest official display driver to best match with Windows 10, either 64-bit or 32-bit.
Try Driver Talent on any Windows laptop, desktop or notebook, such as Asus, Acer, Dell, Lenovo, HP, ThinkPad, Toshiba, IBM, Sony, Gateway, Samsung, etc. to fix your video card error in Win 10.
1,101,547 people have downloaded it
762,856 people have downloaded it
UpdatedDriveTheLife has been updated to the new version called Driver Talent with a fresh new look.

Step 1. Scan the Graphics Card and Driver on Your Computer

Run Driver Talent after you install it on your computer, and click "Scan". It will scan your computer to check if the graphics driver is outdated, corrupted, damaged, missing or incompatible with Windows 10.

Step 2. Update or Fix the Graphics Driver

Driver Talent will show you in details. If the display driver is outdated, it will provide the “Update” button for you to 1-clcik update the driver; if the display driver is damaged, corrupted, or missing, you will have the “Repair” button to repair the driver with 1 click.
fix graphics on windows 10

Step 3. Restart the Windows 10 Computer

The last step is to restart your computer. This will help to finish the driver installation.
Quick solution with Driver Talent!
Note: Some users reported that reinstalling the display driver can’t help to solve this issue. This is because the driver you reinstall can’t work properly on the Windows 10. Try Driver Talent to fix this driver issue.
If you have any problem, leave it in your comment below. We’ll try to help out.

How to One-click Make Your Lenovo Laptop, Notebook, Desktop a Free WiFi Hotspot

Staying connected to the internet on your iPhone, Samsung Galaxy, HTC one, or other mobile devices becomes a necessary part in daily life. If there is a WiFi hotspot access point, that will be perfect, since it helps avoid mobile data plan overcharges. You may consider to create your own WiFi hotspot on your Lenovo laptop, notebook or desktop computer. We’ve received many messages like “how can I make my Lenovo laptop G505S as WiFi hotspot”, “can I use my Lenovo thinkpad as a WiFi hotspot for my mobile phone”, or “my office has a few Wi-Fi dead zones can I use Lenovo laptop to hotspot converter”. For your information, we’ll describe the all-round tips to help you turn a Lenovo computer into a free WiFi hotspot on Windows 10/8.1/8/7/XP/Vista.
Here are the contents:


Part 1. Can I Use My Lenovo Laptop/Desktop as a WiFi Hotspot?

Yes, you can use your Lenovo Y50, Yoga, Thinkpad or any other Lenovo computer as a free WiFi hotspot to share internet connection, as long as your computer has internet connection and a working wireless network adapter.
A wireless network adapter is the must-have device to make your PC share internet connection. Almost all Lenovo laptops and notebooks have a wireless network adapter already installed, and parts of desktop computers come with one. You’d better check if your Lenovo computer has a working wireless network adapter or not.
Go to the Device Manager to find if there is a network adapter that includes “wireless” in the name under “Network adapters”.
Note: Click on the Start button on your computer and type “device manager” in the search box. Then you can locate the Device Manager.
device manager
If your Lenovo laptop or desktop doesn’t have a wireless network adapter, you can purchase one from electronics stores or online. The USB wireless LAN network card is a good choice, because it can be moved around to different computers.
Make sure the wireless network adapter or the USB wireless network card is correctly installed on your Lenovo computer. You can try to install a correct wireless network driver for it.

Part 2. How to Make Lenovo PC a Free WiFi Hotspot on Windows 10/8.1/8/7/XP/Vista -- One Click

There are a few methods to convert your Lenovo computer into a WiFi hotspot access point. Some requires computer skills and laborious commands, while some would help you one-click to make your laptop or desktop a free WiFi hotspot. If you prefer an easier solution, try OSToto Hotspot (formerly called 160WiFi). It’s a professional and free WiFi hotspot converter for Lenovo, and enables you to instantly turn a Lenovo laptop, notebook or desktop PC into WiFi hotspot on Windows 10, Windows 8.1, Windows 8, Windows 7, Windows XP, and Windows Vista, either 64 bit or 32 bit.
Free download and install OSToto Hotspot on your Lenovo computer.
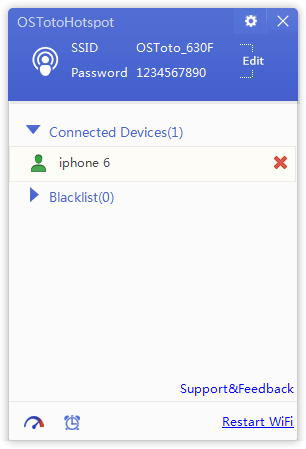
After you install OSToto Hotspot, launch it. It will automatically transform your Lenovo PC into a WiFi hotspot. You will see a WiFi hotspot access point window.
lenovo laptop to hotspot
Now use other Wi-Fi enabled devices to connect to the WiFi hotspot with the password.

Part 3. How to Turn Lenovo Computer into a WiFi Hotspot Using Command Prompt

You can use command prompts to set up a WiFi hotspot on your Lenovo PC, especially for Windows 10, Windows 8.1, and Windows 8. One important thing you should notice is that you may not have internet access although you’ve joined the WiFi hotspot. This can easily happen in some special computer operating environments. You can tryOSToto Hotspot like above instead.
If you want more detailed information on how to set up or turn on the WiFi hotspot on Lenovo with command prompt, see Top 3 Ways to Build A Free WiFi Hotspot on Computer.

Part 4. Share Your Lenovo PC Internet Connection with iPhone, iPad, Android Mobile Phones, etc.

You can turn all Lenovo computers into WiFi hotspots, and share internet connection with any WiFi enabled devices, like iPhone, iPad, iPod touch, or Android mobile smartphones.
Below are the hottest Lenovo laptops, notebooks, and desktop PCs that most of you would like to make a free WiFi hotspot.
Lenovo G50-80 laptop
Lenovo Z70-80 laptop
Lenovo Yoga 3
Lenovo Z41-70
Lenovo Y70-70
Lenovo ThinkPad L450
Lenovo Ideapad
Lenovo Edge 15
Lenovo gaming laptop
Lenovo Y70-80
Lenovo S21E-80
Lenovo Y50
Lenovo Thinkpad Yoga 14
Lenovo Yoga 2
Lenovo Flex 3
Lenovo Flex 2-15D
Lenovo Yoga 3 Pro
Lenovo ThinkCentre desktop
Lenovo K450E
Lenovo all-in-one B40
Lenovo Horizon II
Lenovo B50
Lenovo Horizon 2S
Lenovo Ideacentre Flex 20
Lenovo M73
Lenovo B40
Lenovo Y40 laptop
Lenovo Z50 laptop
Lenovo G50 laptop
And more

Windows 8/8.1 Drivers for MacBook Pro/Air Free Download, Install and Update

If you’ve installed Microsoft Windows 8.1 on MacBook laptop, or Windows 8 on your Apple MacBook desktop, you have to install support drivers, such as Windows 8 Bootcamp drivers. The MacBook drivers for Windows 8 or Windows 8.1 are the essential software to make Windows OS run smoothly and properly on your Mac. If the drivers are outdated, missing, corrupted, damaged, improper, or incompatible, you will have issues on Windows 8/8.1 on your MacBook.
Luckily, downloading MacBook drivers for Windows 8 or Windows 8.1 is very easy with Driver Talent (formerly called DriveTheLife). It is a free, safe and professional Windows drivers download and update utility. You can use it to get all 64-bit and 32-bit Windows 8 and Windows 8.1 drivers for MacBook Pro Retina, MacBook Pro, MacBook Air, and MacBook Retina, including Windows 8 wireless drivers for MacBook Pro, Windows 8 sound drivers for MacBook Pro, Windows 8 network drivers for MacBook Pro, Windows 8.1 audio drivers for MacBook, MacBook Air keyboard drivers for Windows 8, etc.
Free download and install Driver Talent on your MacBook laptop or desktop on Windows 8 or Windows 8.1. It will help to download all MacBook drivers.
UpdatedDriveTheLife has been updated to the new version called Driver Talent with a fresh new look.
You can also use this utility to download Windows 10 drivers for MacBook.

How to Free Download, Install or Update Windows 8/8.1 Drivers for MacBook Pro/Air

Driver Talent doesn’t create drivers, but collects all official drivers from Apple, Microsoft and other manufacturers to help you get the best-matched Windows drivers for your MacBook at the top speed. It provides 1 click and 1 stop solution to download, install and update Windows drivers for Mac computer, including Windows 8/8.1 drivers for MacBook computer.
Here are the steps to show you how to 1 click to get MacBook drivers for Windows 8 and Windows 8.1.

Step 1. Scan MacBook to Find All Driver Problems

Launch Driver Talent on your MacBook laptop or desktop. It will have a safe scan on your computer to find all driver issues and computer problems.
Note: If you have USB devices to connect to MacBook, such as iPhone, iPad, USB keyboard, USB mouse, USB hard drive, etc., connect them to the MacBook to allow Driver Talent scan drivers issues.

Step 2. Download, Install or Update MacBook Drivers for Windows 8/8.1

Driver Talent offers 1 click to download, install and update all drivers. Select the drivers and then click on the “Start” button. This tool will begin to download and install the latest and also the best-matched Windows 8 or Windows 8.1 drivers for your MacBook hardware and devices.
windows 8 drivers for macbook

Step 3. Reboot MacBook

Restart your MacBook after all drivers are downloaded. Driver Talent will inform you to restart the computer in a pop-up window.

The Most Common MacBook Pro/Air Drivers for Windows 8 and Windows 8.1

Here are we list the most common MacBook drivers for Windows 8 and 8.1 you may search mostly. Driver Talent can download all the Windows drivers for your MacBook. Also see: Mac Drivrs for Windows 10/8/7/XP/Vista Free Download.
Windows 8/8.1 drivers for MacBook Pro (Retina, 2015)
Windows 8.1/8 drivers for MacBook Pro (Retina, 2014)
Windows 8.1/8 drivers for MacBook Pro (Retina, 2013)
Windows 8.1/8 drivers for MacBook Pro (Retina, 2012)
Windows 8.1/8 drivers for MacBook Pro (2012)
Windows 8.1/8 drivers for MacBook Pro (2011)
Windows 8.1/8 drivers for MacBook Pro (2010)
Windows 8.1/8 drivers for MacBook Air (2015)
Windows 8.1/8 drivers for MacBook Air (2014)
Windows 8.1/8 drivers for MacBook Air (2013)
Windows 8.1/8 drivers for MacBook Air (2012)
Windows 8.1/8 drivers for MacBook Air (2011)
Windows 8.1/8 drivers for MacBook (Retina, 2015)
Windows 8.1/8 drivers for Macbook laptop
Windows 8.1/8 drivers for MacBook desktop
Windows 8 MacBook drivers for Xbox 360 controller
Windows 8 wireless drivers for MacBook Pro
Windows 8 sound drivers for MacBook Pro
Windows 8.1 audio driver for MacBook Pro
Windows 8 Wi-Fi drivers for MacBook Pro
Windows 8 network drivers for MacBook Pro
MacBook Air sound drivers for Windows 8
MacBook Air keyboard drivers for Windows 8
Apple MacBook Air drivers for Windows 8
MacBook Pro Windows 8 trackpad driver
MacBook graphics driver for Windows 8.1/8
MacBook touchpad driver for Windows 8.1/8
MacBook Bluetooth driver for Windows 10
Windows 8.1/8 Canon drivers for MacBook
Windows 8.1/8 Bootcamp drivers for MacBook
Windows 8.1/8 game drivers for MacBook
Windows 8.1/8 Nvidia drivers for MacBook
And more

Monday, February 22, 2016

HOW TO INSTALL WINDOWS 8 ON A MAC

how to install windows 8 on a mac
Though Windows 8 has received mixed reviews, it remains Microsoft’s latest operating system. If you own a Mac, and you want to use Windows, purchasing Windows 8 is likely the best option.
Unfortunately, it’s also a bit harder to install that than Windows 7. Changes to the way Microsoft sells its new operating system, along with a lack of support from the current version of Boot Camp, makes installation slightly more harrowing. But don’t worry; the steps are still doable for even the newest Mac owner.

Before you begin

windows8boxes
Windows 8 is the first version of Microsoft’s operating system to lack a retail copy. Want to walk down to the local electronics store and buy a fresh install? Too bad! You’ll find none on their shelves. You’ll only be able to purchase upgrade versions, and, since those require you have a previous Windows installation, they won’t work with Boot Camp.
The upgrade version will work if you’ve already installed Windows on your Mac with a valid key. Owners who have Windows 7 can follow the steps in this guide, install that version of Windows, and then install Windows 8 Upgrade.
Since the retail version is gone, you’ll instead have to buy an OEM copy. This isn’t carried by most brick-and-mortar retailers, but speciality computer retailers might have it. You can also find it at online stores like Amazon and Newegg. A regular copy of Windows 8 OEM is $99 and Windows 8 Pro OEM is $139.
You’ll also need to make sure your Mac has OS X Mountain Lion (so you have the latest version of Boot Camp) and at least 20GB of empty hard disk space. Free space is needed because Windows 8 will be installed on a partition of your Mac’s hard drive reserved specifically for it. That partition will also be used to store any software you install while using Windows 8.

Create a bootable USB drive (for Macs with no optical drive)

Owning a Windows 8 disk isn’t helpful if your Mac doesn’t have an optical drive. To make matters worse, Microsoft doesn’t offer an online install of Windows 8 OEM. You’ll need to use an alternative method of installation.
The easiest solution is to use an external optical drive that connects to your Mac via USB. These are not hard to find, but they’re also not free. Expect to pay $25 to $50 if you buy from an online retailer, or $79 if you buy Apple’s own version. If you decide to purchase an external optical drive, skip to the next step.
appleopticaldrive
Still reading? Okay. To skip the use of an optical drive entirely, you’ll need a USB drive with at least 4GB of space and access to a Windows PC that does have an optical drive.
Download and install Imgburn to that computer, insert your Windows 8 install disk (but don’t run the installer), and then run ImgBurn. Select “Create Image from Disc,” select the optical drive (if not already chosen), set a destination, and then click the icon at the bottom. This will create a .ISO file from the Windows 8 install disc.
windows7dvd-usb
Now that you have the .ISO file, you need to put that file on a USB drive. To do this, download the Windows 7 USB/DVD tool from Microsoft’s website. Despite the name, it works with Windows 8 as well. Install the utility, open it, and select “USB Device” at the second step. Connect a USB flash drive, select it in the utility, and then continue with the wizard. After a few minutes, you’ll have a bootable installation drive.
If you don’t want to use Windows 7 USB/DVD tool, or you have trouble with it, Unetbootin works as well. Though primarily used for Linux, Unetbootin supports creation of bootable Windows drivers. You simply need to select the Windows .ISO manually, instead of from the drop-down list of Linux distros.

Begin Boot Camp

Open Boot Camp through a Finder search for “boot camp” or by opening Launchpad and then the Other folder. You’ll come to an introduction screen that provides information and suggests a backup of important information before you install Windows (always a good idea). Click the Continue button.
windows8onmac1
You’ll see several options in the next screen. De-select “Create a Windows 7 or later version install disk” because you already have an install disc or a bootable USB drive. Leave the other two options selected, and then click Continue again.
Now you’ll have a choice of where to play the support software files. These drivers help your make communication with Windows, an operating system it wasn’t designed for. You can send these drivers to a CD/DVD or to a USB drive – your choice. Don’t place them on the same USB drive that contains your Windows .ISO, though.
windows8onmac2
Check that you have a network connection, then click Continue once more. The support drivers will now download. This processor can take some time, so go make a sandwich, do some push-ups, and water the flowers.
Once the support drivers have finished, the next step is to create a partition. Boot Camp will give Windows only 20GB of space by default, which is enough to do an install and not much else. We suggest increasing that number by dragging the bar between the Mac OS X and Windows 8 partitions. Click the Install button once you’re satisfied with the space reserved for Windows.
windows8onmac4
After partitioning is complete, which should only take a few minutes, restart the Mac and insert your Windows install disc or the bootable USB drive you created earlier. The system will automatically try to boot from your Windows 8 installation media. If you receive a “No boot drive found” error message, try restarting again but this time hold down the Option key while doing so. This brings up the boot manager which will display three partitions: one for OS X, one for OS X recovery, and one for Windows. Select the Windows option to proceed with installation.

Install Windows 8

windows8installscreen
Now you’re in the Windows 8 installation wizard. Follow the on-screen instructions and you’ll come to a screen that asks which partition you want to install Windows on. Select the one labeled BOOTCAMP. You will also need to format this partition to NTFS (the Windows file system) before installation can proceed.
And that’s it. There are more steps, but they aren’t different from installing Windows 8 on any other laptop, and the wizard will explain what you need to do (create a user account, for example). You’ll have Windows 8 on your Mac within half an hour.
After installation is complete, your final task is to install the Windows support drivers. Insert the disc or USB drive you placed them on and open setup.exe in the WindowsSupport folder. Follow the installation wizard and you’ll be done.

Wrapping up Windows 8

windows8onmacheader
You’ve now installed Windows 8 on your Mac. There are, however, two more things you should know about how to operate the new OS.
To switch between Mac OS X and Windows 8 you must restart the system. Hold down the option key as soon as it begins to boot. This will bring you to the boot manager. Now you can select either OS X, the recovery partition, or Windows 8.
Also, you may notice features that don’t work properly when in Windows. At the time of this writing, Apple does not support Windows 8, so the support drivers you download are for Windows 7. In addition, the drivers for Windows are basic even when fully supported, so don’t expect your experience to take complete advantage of your Mac’s hardware.


Read more: http://www.digitaltrends.com/computing/how-to-install-windows-8-on-a-mac/#ixzz40uIdUk2W
Follow us: @digitaltrends on Twitter | digitaltrendsftw on Facebook